

An in-ground lawn watering system is one of the most convenient, effort-free ways to keep the lawn lush and green without the risk of overwatering and underwatering.
The pipes go underground, and the sprinkler heads are carefully distributed according to the irrigation map to provide the best results for the lawn. Moreover, proper sprinkler system setup saves water and money and prevents lawn diseases by promoting healthy root growth.
Learning how to install sprinkler system is a solid way to determine if you are ready for a DIY project or if pros need to install the system. New sprinkler system installation can be complex and intimidating, so we broke the process down for easier understanding.
Planning the Sprinkler System
So, you’ve decided to install underground sprinkler system, but you know nothing about it. Here is how to start planning the process to streamline the lawn sprinkler installation.
Assess Your Lawn and Garden Needs
Evaluate your lawn features and needs to ensure you are starting on the right track. Consider:
- Lawn size and shape – The size and lawn shape determine the sprinklers amount and type
- Plant types – Grass needs more shallow watering, while trees require watering at deeper levels
- Specific watering needs – Consider slopes, drought-prone areas, and wind as they can affect underground sprinkler system installation
Research Local Codes and Permits
Knowing about local codes and permit requirements protects you from fines and ensures legal compliance.
- Contact local authorities to get specific information
- Review zoning maps to ensure your property is in the zone where sprinkler systems are allowed
- Apply for permits
- Understand water restrictions to ensure the installation complies with them
Water Pressure and Flow Rate Measurement
The pressure between 40 and 60 psi works for most systems. Lower pressure leads to poor coverage, while higher pressure contributes to water waste. The adequate flow rate depends on the system, so you should consult the sprinkler system kit guide to understand the requirements.
Then, measure the water pressure with the pressure gauge you can get in any hardware store. Flow rate might be more complex to identify because you’ll need to do some math. Grab a bucket and collect water for a set amount of time and calculate:
| The volume of water (gallons/liters) / the collecting time (minutes) = Water flow rate (Gallons/liters per minute) |
Choose Sprinklers and Design the Layout
There are several sprinkler heads to pick:
- Pop-up sprinklers – The most common type, available in different sizes and spray strength
- Spray heads – Ideal for small lawns, cover up to 25 feet, great for shrubs, trees and flower beds
- Micro sprinklers – Good for delicate plants, ground covers, and flower baskets
- Rotors – Suitable for large lawns and fields, cover up to 50 feet
During an in ground sprinkler installation setting up an adequate layout can be challenging. Here is how to do it efficiently:
- Create zones – Divide the lawn based on sun exposure, plant types, soil, and the watering needs of each zone
- Select and space sprinkler heads – Consult manufacturer information based on ideal sprinkler head spacing
- Consider slopes, wind, and obstacles – Determine the angle of the sprinkler heads
- Overlap – Provide overlapping to prevent dry spots and ugly patches
Gathering Materials and Tools
Here is what you’ll need for lawn sprinkler system installation, including materials you get with the kit. Purchase separately the tools to dig holes, cut pipes, mark the layout, etc.
Materials needed:
- Pipes
- Sprinkler heads
- Valves
- Backflow preventer
- Fittings
- Controller
Tools needed:
- Trenching shovel
- Pipe cutter
- Tape measure
- Marking paint:
- Wrench.
- Level
- Utility knife
- Shovel
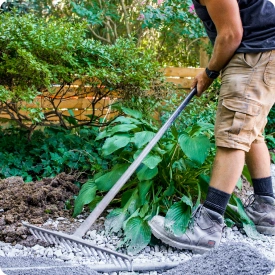
Marking and Digging Trenches
Use a measuring tape to determine a precise location for sprinkler heads and consider the trees and obstacles you may encounter.
Once you have everything marked, proceed with digging trenches with a shovel. Most sprinkler systems work best at a depth between 6 and 12 inches, but check with the manufacturer’s guide for exact depth. Stay away from utility lines and be gentle on slopes and around plants’ roots, to prevent harming them.
Installing the Sprinkler System Components
To install underground sprinkler system, proceed with pipe alignment. Cut them with a pipe cutter to the desired length, and clean them from debris and dirt. Connect them with elbows, tees, or coupling, and tighten the fittings with a wrench.
Then, secure them with pipe clamps and align them correctly to prevent water flow obstructions.
Next, determine the height of sprinkler heads, secure each head with an appropriate fitting, and angle it according to the wind conditions.
When installing valves, pick valve locations in every zone that are easily accessible and provide good control of the system. Connect the valves with a mainline and put them in boxes to protect them from weather.
Backflow Preventer Installation
A backflow preventer prevents contaminated water from going into your water system. Hiring a professional plumber to install a backflow preventer in the connection point between your sprinkler system and your home water ensures proper functioning and legal compliance.
Connecting the System to the Water Supply
Typically, the sprinkler system is connected to the water supply in one of two ways:
- Hose bib connection – Simple option for small systems, simply connect a garden hose to a hose bib outside the home
- Tapping into the main line – Tapping directly into the home main water line is complex and requires professional handling to prevent malfunctions
Once the system is connected, you’ll need to test water pressure for every zone. Use a pressure gauge in every zone and check for leaks. If you notice wet spots or water pooling, adjust the pressure with a valve to prevent leaks and problems with the system.
Installing the Controller
Once the system components are set, decide whether to mount the controller indoors or outdoors.
Wiring is simple, but you’ll have to be precise:
- Identify and label wires from each control valve for each corresponding system zone
- Connect the wires according to the system instructions
- Double-check each connection to prevent malfunctions
The final step is controller programming. Consider several factors to set watering schedules for each zone:
- Time of the way – Morning or late evening watering sessions minimize evaporation rates
- Duration – Set the timer for every zone, based on plant needs, weather, soil type, shade, etc.
- Watering frequency – Manually set frequency for every zone
- Optional – Weather adjustments – If your controller has a weather-based option to automatically modify watering, enable it
- Test cycle – Run a test on every zone and record the results, adjust the watering times and durations if needed
Covering the Trenches and Final Adjustments
Once you are sure the system is working and no further adjustments in the in-ground components are needed, fill the trenches with soil:
- Remove debris to prevent system problems
- Add soil in layers and compact each layer
- Avoid over-compaction as it can restrict water flow
- Level up the soil and reseed if there are damaged areas
- Water each trench thoroughly
Next, adjust sprinkler heads to ensure optimal coverage. Try various nozzles to see which one works the best and angle it so nothing obstructs the desired coverage.
Testing and Fine-Tuning the System
Before the installation is complete, another test cycle is required. Here is a checklist to complete the sprinkler system setup:
- Test each zone individually for gaps, uneven coverage, and excessive run-off
- Evaluate coverage for each lawn area
- Identity leaks by wet spots or water pooling
- Monitor time to ensure the controller is working as you’ve set it
Lastly, make the necessary adjustments in spray patterns and fix the leaks. In addition, you may have to reposition or re-angle sprinkler heads for the best results.
Maintenance Tips for Your In-Ground Sprinkler System
Now you know how to install in-ground sprinkler system, here is how to maintain it:
- Keep the system safe during the winter by draining or blowing out, to prevent freezing
- Regularly inspect the system for leaks, problems with water pressure, clogging, etc.
- Seasonal and timely weather adjustments – Check the weather forecast for expected precipitation and adjust the watering schedules based on the results for each season
Key Takeaways
You can install a lawn sprinkler system with careful planning and a systematic approach. You’ll need basic tools for digging, cutting, measuring, and marking the layout. However, advanced tasks, such as the installation of backflow preventers, should be handled by professionals.
Testing and adjusting a sprinkler system is a standard practice to ensure maximum coverage, optimal water usage, and technical problems with your system.
Proper installation of the in-ground sprinkler system will save effort, time, and money and ensure the good health of your lawn.
FAQ
Is underground sprinkler system installation expensive?
Sprinkler system cost may be high if you have a particularly large lawn with rocky soil. Still, you can save money by doing some installation steps, such as digging and marking the layout yourself.
How deep should the sprinkler pipes and trenches be?
Most manufacturers specify the desired depth, which is often between 6 and 8 inches. However, in extremely cold climates and heavy slopes, you may have to dig deeper.
When should I call a plumber during the sprinkler system setup?
A professional plumber should take care of water supply connections for large and complex systems, backflow preventer installation, and mainline installation. But, you can also hire a plumber to assist you with valve connection, troubleshooting, permit assistance, etc.